2012年11月30日金曜日

マウスの移動速度をプログレスバーに表示

マウスの移動速度をリアルタイムに測定してプログレスバーを速度メーターに見立てて表示します。
現在時刻から過去0.3秒間のマウスカーソルの移動距離を、20ミリ秒ごとに計算して、プログレスバーを更新します。
マウスを激しく動かすと、プログレスバーの Value プロパティが 100、つまりMAXになり、しばらくマウスを動かさないと0になります。

画面上のマウスの位置を取得するには、User32.dll の GetCursorPos を使います。


MainWindow.xaml

<Window x:Class="ProgressBarTest.MainWindow"
        xmlns="http://schemas.microsoft.com/winfx/2006/xaml/presentation"
        xmlns:x="http://schemas.microsoft.com/winfx/2006/xaml"
        Height="80" Width="160" Loaded="Window_Loaded">
    <Grid>
        <Grid.RowDefinitions>
            <RowDefinition Height="Auto"/>
            <RowDefinition Height="*"/>
        </Grid.RowDefinitions>
        <TextBlock Grid.Row="0" Name="textBlock1" />
        <ProgressBar Grid.Row="1" Width="130" Height="20" Name="progressBar1" />
    </Grid>
</Window>

MainWindow.xaml

using System;
using System.Collections.Generic;
using System.Runtime.InteropServices;
using System.Windows;
using System.Windows.Threading;

namespace ProgressBarTest
{
    public partial class MainWindow Window
    {
        private Queue<double> queue = new Queue<double>();
        private Point prePoint;

        [DllImport("User32.dll")]
        private static extern bool GetCursorPos(ref Win32Point pt);

        public MainWindow()
        {
            InitializeComponent();
        }

        private void Window_Loaded(object sender, RoutedEventArgs e)
        {
            DispatcherTimer timer = new DispatcherTimer();
            timer.Tick += timer_Tick;
            timer.Interval = new TimeSpan(0, 0, 0, 0, 20);
            timer.Start();
        }

        private void timer_Tick(object sender, EventArgs e)
        {
            Point point = GetMousePosition();
            double x = this.prePoint.X - point.X;
            double y = this.prePoint.Y - point.Y;
            double nextLength = Math.Sqrt(x * x + y * y);
            this.queue.Enqueue(nextLength);
            if (this.queue.Count > 15)
            {
                this.queue.Dequeue();
            }
            this.prePoint = point;
            double total = 0;
            foreach (double length in queue)
            {
                total += length;
            }
            this.progressBar1.Value = total / 30;

            this.textBlock1.Text = point.X + ", " + point.Y;
        }

        [StructLayout(LayoutKind.Sequential)]
        private struct Win32Point
        {
            public int X;
            public int Y;
        }

        public static Point GetMousePosition()
        {
            Win32Point win32Point = new Win32Point();
            GetCursorPos(ref win32Point);
            return new Point(win32Point.X, win32Point.Y);
        }
    }
}

ドラッグ アンド ドロップ したファイルの内容を表示

AllowDrop を true にして、Window をドラッグアンドドロップの操作対象にします。これを指定しないと、DragOver などのイベントが発生しません。

DragOver イベントの処理で、ドラッグ中のモノがファイルかどうかを判断して、ファイルならドロップを有効にします。イベント引数 DragEventArgsの Effects プロパティを DragDropEffects.All と マウスカーソルがドロップできるアイコンになります。

e.Effects = e.Data.GetDataPresent(DataFormats.FileDrop) ?DragDropEffects.All : DragDropEffects.None;

以下のコードで、実際にファイルをドラッグアンドドロップすると、テキストブロックにファイルの内容が表示されるので、一見うまく動作しているようですが、問題点があります。
ファイル以外のモノを DragOver しても、マウスカーソルが DragDropEffects.None の形になりません。
おそらく、Window の DragOverイベントの処理のあとに、なんらかの処理がされてマウスカーソルが上書きされてしまっているようなので、DragOver イベントハンドラに次のコードを追加して、なんらかの処理をさせないようにします。

e.Handled = true;

MainWindow.xaml

<Window x:Class="DragDropTest.MainWindow"
        xmlns="http://schemas.microsoft.com/winfx/2006/xaml/presentation"
        xmlns:x="http://schemas.microsoft.com/winfx/2006/xaml"
        Height="200" Width="300"
        DragOver="Window_DragOver" Drop="Window_Drop" AllowDrop="True">
    <TextBlock Name="textBlock1" />
</Window>

MainWindow.xaml.cs

using System.IO;
using System.Windows;

namespace DragDropTest
{
    public partial class MainWindow Window
    {
        public MainWindow()
        {
            InitializeComponent();
        }

        private void Window_DragOver(object sender, DragEventArgs e)
        {
            e.Effects = e.Data.GetDataPresent(DataFormats.FileDrop) ?                  DragDropEffects.All : DragDropEffects.None;
        }

        private void Window_Drop(object sender, DragEventArgs e)
        {
            if (e.Data.GetDataPresent(DataFormats.FileDrop))
            {
                string[] docPath = (string[])e.Data.GetData(DataFormats.FileDrop);
                this.textBlock1.Text = File.ReadAllText(docPath[0]);
            }
        }
    }
}

2012年11月29日木曜日

DispatcherTimerでアナログ時計

DispatcherTimerの使い方は、「DispatcherTimerでデジタル時計」と同じです。
Tick イベントの処理で、秒針、短針、長針の位置を計算して、Lineを再描画しています。
ウィンドウのタイトルにも時刻を表示します。


MainWindow.xaml

<Window x:Class="AnalogClock.MainWindow"
        xmlns="http://schemas.microsoft.com/winfx/2006/xaml/presentation"
        xmlns:x="http://schemas.microsoft.com/winfx/2006/xaml"
        Height="280" Width="260">
    <Canvas>
        <Canvas.Resources>
            <Style TargetType="Line">
                <Setter Property="StrokeThickness" Value="0.1" />
                <Setter Property="Stroke" Value="Black" />
            </Style>
        </Canvas.Resources>
        <Canvas.RenderTransform>
            <MatrixTransform>
                <MatrixTransform.Matrix>
                    <Matrix OffsetX="120" OffsetY="120" M11="10" M12="0" M21="0" M22="-10"/>
                </MatrixTransform.Matrix>
            </MatrixTransform>
        </Canvas.RenderTransform>
        <Line X1="0" Y1="0" X2="0" Y2="0" Name="secondLine" StrokeThickness=".05" />
        <Line X1="0" Y1="0" X2="0" Y2="0" Name="minuteLine" />
        <Line X1="0" Y1="0" X2="0" Y2="0" Name="hourLine" StrokeThickness=".2" />
        <Line X1="0" Y1="10" X2="0" Y2="11" />
        <Line X1="10" Y1="0" X2="11" Y2="0" />
        <Line X1="0" Y1="-10" X2="0" Y2="-11" />
        <Line X1="-10" Y1="0" X2="-11" Y2="0" />
    </Canvas>
</Window>

MainWindow.xaml.cs

using System;
using System.Windows;
using System.Windows.Threading;

namespace AnalogClock
{
    public partial class MainWindow Window
    {
        public MainWindow()
        {
            InitializeComponent();

            DispatcherTimer timer = new DispatcherTimer();
            timer.Tick += timer_Tick;
            timer.Interval = new TimeSpan(0, 0, 1);
            timer.Start();
        }

        void timer_Tick(object sender, EventArgs e)
        {
            DateTime now = DateTime.Now;
            this.Title = now.ToString("HH:mm:ss");

            double secondRadian = 2 * Math.PI / 60 * now.Second;
            this.secondLine.X2 = Math.Sin(secondRadian) * 10;
            this.secondLine.Y2 = Math.Cos(secondRadian) * 10;

            double minuteRadian = 2 * Math.PI / 60 * now.Minute;
            this.minuteLine.X2 = Math.Sin(minuteRadian) * 10;
            this.minuteLine.Y2 = Math.Cos(minuteRadian) * 10;

            double hourRadian = 2 * Math.PI / 720 * ((now.Hour % 12) * 60 + now.Minute);
            this.hourLine.X2 = Math.Sin(hourRadian) * 7;
            this.hourLine.Y2 = Math.Cos(hourRadian) * 7;
        }
    }
}

DispatcherTimerでデジタル時計


DispatcherTimer クラスを使って、1秒ごとに現在時刻を表示するテキストブロックのテキストを更新します。
タイマーが動作する間隔を Interval プロパティに指定します。
timer.Interval = new TimeSpan(0, 0, 1);

Tick イベントに指定した処理が、Interval の間隔ごとに呼び出されます。
timer.Tick += timer_Tick;

テキストブロックのスケールをウィンドウの横幅に比例させて、ウィンドウいっぱいにテキストが表示されるようにします。
初期状態では、ウィンドウの横幅が300で、テキストブロックのフォントサイズが0.2なので、300*0.2=60のフォントサイズになります。

ウィンドウのサイズを変えると、その大きさに比例して文字の大きさも変わります。


MainWindow.xaml


<Window x:Class="MyClock.MainWindow"
        xmlns="http://schemas.microsoft.com/winfx/2006/xaml/presentation"
        xmlns:x="http://schemas.microsoft.com/winfx/2006/xaml"
        Height="150" Width="300">
    <TextBlock Name="textBlock1" FontSize="0.2">
        <TextBlock.RenderTransform>
            <ScaleTransform ScaleX="{Binding RelativeSource={RelativeSource FindAncestor
                                     AncestorType={x:Type Window}}, Path=ActualWidth}" 
                            ScaleY="{Binding RelativeSource={RelativeSource FindAncestor
                                     AncestorType={x:Type Window}}, Path=ActualWidth}" />
        </TextBlock.RenderTransform>
    </TextBlock>
</Window>


MainWindow.xaml.cs

using System;
using System.Windows;
using System.Windows.Threading;

namespace MyClock
{
    public partial class MainWindow : Window
    {
        public MainWindow()
        {
            InitializeComponent();

            DispatcherTimer timer = new DispatcherTimer();
            timer.Tick += timer_Tick;
            timer.Interval = new TimeSpan(0, 0, 1);
            timer.Start();
        }

        void timer_Tick(object sender, EventArgs e)
        {
            this.textBlock1.Text = DateTime.Now.ToString("HH:mm:ss");
        }
    }
}

2012年11月28日水曜日

PowerEaseを使った自由落下のアニメーション

自由落下のアニメーション」では、非同期処理で物体の落下をアニメーションしてみたが、
WPFのアニメーション機能を使えば、もっと簡単に自由落下をシミュレートできる。
PowerEase クラスは、プロパティの変化を時間のn乗(y=t^n)に応じた値に計算してくれる。
たとえば、プロパティの値を、3秒間に0から9まで変化させたい場合、nを2とすると、
1秒後 ・・ 1^2 = 1
2秒後 ・・ 2^2 = 4
3秒後 ・・ 3^2 = 9
となる。
物体の落下距離も時間の2乗に比例するので、PowerEaseのPowerプロパティの値を 2 にしている。
<PowerEase Power="2" EasingMode="EaseIn"/>

物体の運動の始点と終点は、PointAnimation で指定する。
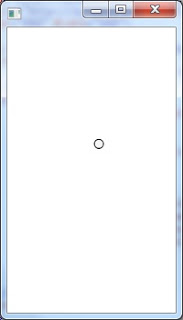
ここでは、円の中心座標を PointAnimation で指定した座標間を移動するようにしている。
円は EllipseGeometry で作成する。円の中心座標は EllipseGeometry の Centerプロパティの値なので、これを Storyboard.TargetProperty に指定する。
始点(100,0)から 終点(100,300) までを1秒間に移動させたい場合はつぎのようになる。

<PointAnimation Storyboard.TargetName="MyEllipseGeometry" 
                                            Storyboard.TargetProperty="Center"
                                            From="100,0" To="100,300" Duration="0:0:1" 
                                            AutoReverse="true" RepeatBehavior="Forever">

同じ動作を繰り返しアニメーションしたい場合は、RepeatBehaviorプロパティに Forever を指定する。また、AutoReverseプロパティを true にすると、アニメーションが逆再生されるので、ボールが跳ね返るような動作になる。


MainWindow.xaml

<Window x:Class="AnimationTest.MainWindow"
        xmlns="http://schemas.microsoft.com/winfx/2006/xaml/presentation"
        xmlns:x="http://schemas.microsoft.com/winfx/2006/xaml"
        Height="350" Width="200">
    <Canvas>
        <Path Name="myPathShape" Fill="WhiteSmoke" Stroke="Black">
            <Path.Data>
                <EllipseGeometry x:Name="MyEllipseGeometry" RadiusX="5" RadiusY="5" />
            </Path.Data>
            <Path.Triggers>
                <EventTrigger RoutedEvent="Path.Loaded">
                    <BeginStoryboard>
                        <Storyboard>
                            <PointAnimation Storyboard.TargetName="MyEllipseGeometry" 
                                            Storyboard.TargetProperty="Center"
                                            From="100,0" To="100,300" Duration="0:0:1" 
                                            AutoReverse="true" RepeatBehavior="Forever">
                                <PointAnimation.EasingFunction>
                                    <PowerEase Power="2" EasingMode="EaseIn"/>
                                </PointAnimation.EasingFunction>
                            </PointAnimation>
                        </Storyboard>
                    </BeginStoryboard>
                </EventTrigger>
            </Path.Triggers>
        </Path>
    </Canvas>
</Window>

2012年11月27日火曜日

自由落下のアニメーション

物体の自由落下をシミュレートします。 空気抵抗は考えません。
1ピクセルを1mにしています。
Task.Factory.StartNew で 非同期処理」の方法で、別スレッドで0.1秒ごとに物体の位置を計算し、通知用の Location クラスのY座標を更新すると、バインドしているEllipseのCanvas.Leftプロパティの値が更新されてアニメーションします。
落下距離が300mを超えると停止します。
Stopwatch クラスの ElapsedMilliseconds プロパティで経過時間をミリ秒で取得します。
重力加速度9.8m/s^2としたときの落下距離はつぎのようになります。

double y = 4.9 * (経過時間ミリ秒/ 1000.0) * (経過時間ミリ秒 / 1000.0);


MainWindow.xaml

<Window x:Class="AnimationTest.MainWindow"
        xmlns="http://schemas.microsoft.com/winfx/2006/xaml/presentation"
        xmlns:x="http://schemas.microsoft.com/winfx/2006/xaml"
        Height="390" Width="225">
    <Grid>
        <Grid.RowDefinitions>
            <RowDefinition Height="Auto"/>
            <RowDefinition Height="Auto"/>
            <RowDefinition Height="*"/>
        </Grid.RowDefinitions>
        <DockPanel Grid.Row="0">
            <TextBlock>経過時間(ミリ秒):</TextBlock>
            <TextBlock Name="millisecondsTextBlock" Text="{Binding Path=Milliseconds}"/>
        </DockPanel>
        <DockPanel Grid.Row="1">
            <TextBlock>落下距離(メートル):</TextBlock>
            <TextBlock Name="heightTextBlock" Text="{Binding Path=Y}"/>
        </DockPanel>
        <Canvas Grid.Row="2">
            <Ellipse Canvas.Left="100" Canvas.Top="{Binding Path=Y}"
                 Height="10" Width="10" Fill="WhiteSmoke" Stroke="Black" />
        </Canvas>
    </Grid>
</Window>


MainWindow.xaml.cs

using System.Diagnostics;
using System.Threading;
using System.Threading.Tasks;
using System.Windows;

namespace AnimationTest
{
    public partial class MainWindow Window
    {
        private Location location = new Location();
        private Task task;

        public MainWindow()
        {
            InitializeComponent();
            this.DataContext = this.location;
            task = Task.Factory.StartNew(obj => ComputeLocation((Location)obj), this.location);
        }

        private void ComputeLocation(Location location)
        {
            Stopwatch sw = new Stopwatch();
            sw.Start();
            while (true)
            {
                Thread.Sleep(100);
                long milliseconds = sw.ElapsedMilliseconds;
                location.Milliseconds = milliseconds;
                double y = 4.9 * (milliseconds / 1000.0) * (milliseconds / 1000.0);
                location.Y = y;
                if (location.Y > 300)
                {
                    break;
                }
            }
        }
    }
}

Location.cs

using System;
using System.ComponentModel;

namespace AnimationTest
{
    public class Location INotifyPropertyChanged
    {
        private long milliseconds;
        public long Milliseconds
        {
            get { return this.milliseconds; }
            set
            {
                if (value != this.milliseconds)
                {
                    this.milliseconds = value;
                    NotifyPropertyChanged("Milliseconds");
                }
            }
        }

        private double y;
        public double Y
        {
            get { return this.y; }
            set
            {
                if (value != this.y)
                {
                    this.y = value;
                    NotifyPropertyChanged("Y");
                }
            }
        }

        public event PropertyChangedEventHandler PropertyChanged;

        private void NotifyPropertyChanged(string info)
        {
            if (PropertyChanged != null)
            {
                PropertyChanged(thisnew PropertyChangedEventArgs(info));
            }
        }
    }
}

係数aを指定して2次曲線を表示

y=ax^2のグラフを表示してみる。係数aは、テキストボックスで指定できるようにする。
座標系は固定で、グラフが画面内におさまるのは、x軸、y軸ともに-15から15までとする。
2次曲線は、実際は曲線で描画していない。0.1ごとのxにたいするyを求めて、点を線分でつなげている。
連続する線分はPolyLineSegment クラスを使う。

Canvasの座標系は、デフォルトだと左上が(0,0)でピクセル単位なので、y座標の正負を逆にしてx、yのスケールを10倍する。
また、OffsetX、OffsetYを150ずつずらして、原点をウィンドウの中心あたりにもってきている。
<Matrix OffsetX="150" OffsetY="150" M11="10" M12="0" M21="0" M22="-10"/>


MainWindow.xaml

<Window x:Class="Graph.MainWindow"
        xmlns="http://schemas.microsoft.com/winfx/2006/xaml/presentation"
        xmlns:x="http://schemas.microsoft.com/winfx/2006/xaml"
        Title="二次曲線 y=ax^2" Height="370" Width="330">
    <Grid>
        <Grid.RowDefinitions>
            <RowDefinition Height="Auto"/>
            <RowDefinition Height="*"/>
        </Grid.RowDefinitions>
        <DockPanel Grid.Row="0">
            <TextBlock DockPanel.Dock="Left">係数a:</TextBlock>
            <TextBox DockPanel.Dock="Left" Width="200" Name="coefficientTextBox"/>
            <Button DockPanel.Dock="Left" Click="Button_Click">描画</Button>
        </DockPanel>
        <Canvas Grid.Row="1" Name="canvas1">
            <Canvas.Resources>
                <Style TargetType="Line">
                    <Setter Property="StrokeThickness" Value="0.1" />
                    <Setter Property="Stroke" Value="Black" />
                </Style>
            </Canvas.Resources>
            <Canvas.RenderTransform>
                <MatrixTransform>
                    <MatrixTransform.Matrix>
                        <Matrix OffsetX="150" OffsetY="150" M11="10" M12="0" M21="0" M22="-10"/>
                    </MatrixTransform.Matrix>
                </MatrixTransform>
            </Canvas.RenderTransform>
            <Path Stroke="Black" StrokeThickness="0.1" Name="path"/>
            <Line X1="-15" Y1="0" X2="15" Y2="0" />
            <Line X1="0" Y1="-15" X2="0" Y2="15" />
            <Line X1="-10" Y1="-0.3" X2="-10" Y2="0.3" />
            <Line X1="10" Y1="-0.3" X2="10" Y2="0.3" />
            <Line X1="-0.3" Y1="10" X2="0.3" Y2="10" />
            <Line X1="-0.3" Y1="-10" X2="0.3" Y2="-10" />
        </Canvas>
        <Canvas Grid.Row="1">
            <TextBlock Canvas.Left="40" Canvas.Top="155">-10</TextBlock>
            <TextBlock Canvas.Left="240" Canvas.Top="155">10</TextBlock>
            <TextBlock Canvas.Left="160" Canvas.Top="40">10</TextBlock>
            <TextBlock Canvas.Left="160" Canvas.Top="240">-10</TextBlock>
        </Canvas>
    </Grid>
</Window>

MainWindow.xaml.cs


using System.Collections.Generic;
using System.Windows;
using System.Windows.Documents;
using System.Windows.Media;

namespace Graph
{
    public partial class MainWindow Window
    {
        public MainWindow()
        {
            InitializeComponent();
        }

        private void Button_Click(object sender, RoutedEventArgs e)
        {
            double a = 1;
            if (this.coefficientTextBox.Text != "")
            {
                a = double.Parse(this.coefficientTextBox.Text);
            }
            List<Point> points = new List<Point>();
            for (double x = -15; x <= 15; x = x + 0.1)
            {
                double y = a * x * x;
                if (-15 <= y && y <= 15)
                {
                    points.Add(new Point(x, y));
                }
            }

            PolyLineSegment myPolyLineSegment = new PolyLineSegment(points, true);
            PathFigure pf = new PathFigure();
            pf.Segments.Add(myPolyLineSegment);
            pf.StartPoint = points[0];
            PathFigureCollection pfc = new PathFigureCollection();
            pfc.Add(pf);
            this.path.Data = new PathGeometry(pfc);
        }
    }
}

2012年11月26日月曜日

コードをハイライトする

C#のソースコードを、Visual Studioのエディタのように色付けしてHTMLで表示したいときがあります。
ソースコードを開くと、正規表現を使って字句解析し、C#の言語仕様で定義されたキーワードとリテラル文字列に色付けし、変換したHTMLをテキストボックスに出力します。
簡素化のため、ここでは次のルールに従ってソースコードが記述されているものとします。

  • トークンは、区切り文字列、リテラル文字列、識別子のいずれか。
  • 区切り文字列は、区切り記号、演算子、キーワード、改行、空白のいずれか。
  • リテラル文字列は、「"」または「'」で囲まれた文字列で、文字列中の「"」「'」は「\」でエスケープされている。
  • 区切り文字列でもリテラル文字列でもないものは識別子。

リテラル文字列の色は「#990000」、キーワードの色は「blue」にしています。

このアプリケーション自身のコード(MainWindow.xaml.cs)を開いてみる


生成されたHTMLをブラウザで開いてみる

MainWindow.xaml

<Window x:Class="CsHighlighter.MainWindow"
        xmlns="http://schemas.microsoft.com/winfx/2006/xaml/presentation"
        xmlns:x="http://schemas.microsoft.com/winfx/2006/xaml"
        Title="MainWindow" Height="350" Width="525">
    <Window.CommandBindings>
        <CommandBinding Command="Open" Executed="OpenCommandHandler"/>
    </Window.CommandBindings>
    <Grid>
        <Grid.RowDefinitions>
            <RowDefinition Height="Auto"/>
            <RowDefinition Height="*"/>
        </Grid.RowDefinitions>
        <Menu Grid.Row="0">
            <MenuItem Command="Open" />
        </Menu>
        <TextBox Grid.Row="1" Name="textBox1"
                 AcceptsReturn="True"
                 ScrollViewer.VerticalScrollBarVisibility="Auto"
                 ScrollViewer.HorizontalScrollBarVisibility="Auto" />
    </Grid>
</Window>

MainWindow.xaml.cs

using Microsoft.Win32;
using System.Collections.Generic;
using System.IO;
using System.Text.RegularExpressions;
using System.Web;
using System.Windows;
using System.Windows.Input;

namespace CsHighlighter
{
    public partial class MainWindow Window
    {
        private static readonly string[] keywords = {
            "abstract","as","base","bool","break","byte","case","catch"
            ,"char","checked","class","const","continue","decimal","default"
            ,"delegate","do","double","else","enum","event","explicit"
            ,"extern","false","finally","fixed","float","for","foreach"
            ,"goto","if","implicit","in","int","interface","internal"
            ,"is","lock","long","namespace","new","null","object","operator"
            ,"out","override","params","private","protected","public"
            ,"readonly","ref","return","sbyte","sealed","short","sizeof"
            ,"stackalloc","static","string","struct","switch","this"
            ,"throw","true","try","typeof","uint","ulong","unchecked"
            ,"unsafe","ushort","using","virtual","void","volatile","while"};

        private static readonly string[] marks = {
            "<<=",">>=","??","::","++","--","&&","||","->","==","!=","<="
            ,">=","+=","-=","*=","/=","%=","&=","|=","^=","<<",">>","=>",
            "{","}","[","]","(",")",".",",",":",";","+","-","*","/","%","&"
            ,"|","^","!","~","=","<",">","?"};

        private static readonly string[] markChars = {
            "{","}","[","]","(",")",".",",",":",";","+","-","*","/","%","&"
            ,"|","^","!","~","=","<",">","?"};

        public MainWindow()
        {
            InitializeComponent();
        }

        private void OpenCommandHandler(object sender, ExecutedRoutedEventArgs e)
        {
            OpenFileDialog ofd = new OpenFileDialog();
            if (ofd.ShowDialog() == true)
            {
                string content;
                using (FileStream fs = new FileStream(ofd.FileName, FileMode.Open, FileAccess.Read, FileShare.ReadWrite))
                using (StreamReader sr = new StreamReader(fs))
                {
                    content = sr.ReadToEnd();
                }

                List<string> tokens = GetTokens(content);
                string htmlCode = GetHtmlCode(tokens);
                this.textBox1.Text = "<!DOCTYPE html><html><head><title></title></head><body>" + htmlCode + "</body></html>";
            }
        }

        private static string GetHtmlCode(List<string> tokens)
        {
            HashSet<string> keywordSet = new HashSet<string>(keywords);
            string htmlCode = "";
            foreach (string token in tokens)
            {
                if (token == "\r\n" || token == "\n")
                {
                    htmlCode += "<br/>";
                }
                else if (keywordSet.Contains(token))
                {
                    htmlCode += "<span style=\"color:blue;\">" + token + "</span>";
                }
                else
                {
                    string tempHtmlCode = HttpUtility.HtmlEncode(token);
                    tempHtmlCode = tempHtmlCode.Replace(" ""&nbsp;");
                    if (token.StartsWith("\"") || token.StartsWith("'"))
                    {
                        tempHtmlCode = "<span style=\"color:#990000;\">" + tempHtmlCode + "</span>";
                    }
                    htmlCode += tempHtmlCode;
                }
            }
            return htmlCode;
        }

        private static List<string> GetTokens(string content)
        {
            string marksRegex = "";
            foreach (string mark in marks)
            {
                foreach (char c in mark)
                {
                    marksRegex += "\\" + c;
                }
                marksRegex += "|";
            }
            string markCharsRegex = "";
            foreach (string c in markChars)
            {
                markCharsRegex += "\\" + c;
            }
            Regex regex = new Regex("(\"(?:[^\"\\\\]|\\\\.)*\")|('(?:[^\'\\\\]|\\\\.)*')|\\r?\\n|\\s+|" +
                marksRegex + "[^\\s\"\'\\r\\n" + markCharsRegex + "]+");
            List<string> tokens = new List<string>();
            MatchCollection mc = regex.Matches(content);
            foreach (Match in mc)
            {
                tokens.Add(m.Value);
            }
            return tokens;
        }
    }
}