2012年12月27日木曜日

string.Length は文字数ではなく char の数

string.Length は char の数 を取得します。
UTF-16 では、1文字を 2バイトまたは4バイトであらわすので、文字列中に 1文字が 4バイトの文字がある場合、Lengthは 文字数になりません。
このような文字列の文字数を取得するには、StringInfo.LengthInTextElements を使います。

また、部分文字列の取得も、「n文字目からm文字・・ 」などで指定する場合は、string.Substring ではなく、StringInfo.SubstringByTextElements を使います。

サンプルプログラムは、入力した文字列の 文字数(StringInfo.LengthInTextElements) と char数(string.Substring) と、各文字の文字コード(UTF-16)を表示します。


MainWindow.xaml

<Window x:Class="StringInfoTest.MainWindow"
        xmlns="http://schemas.microsoft.com/winfx/2006/xaml/presentation"
        xmlns:x="http://schemas.microsoft.com/winfx/2006/xaml"
        Height="350" Width="425">
    <DockPanel LastChildFill="True">
        <TextBox Name="textBox1" DockPanel.Dock="Top"/>
        <Button Click="Button_Click_1" DockPanel.Dock="Top">更新</Button>
        <TextBlock Name="textBlock1" DockPanel.Dock="Top"/>
    </DockPanel>
</Window>

MainWindow.xaml.cs

using System.Globalization;
using System.Windows;

namespace StringInfoTest
{
    public partial class MainWindow Window
    {
        public MainWindow()
        {
            InitializeComponent();
        }

        private void Button_Click_1(object sender, RoutedEventArgs e)
        {
            string text = this.textBox1.Text;

            StringInfo stringInfo = new StringInfo(text);
            string charCode = "";
            for (int i = 0; i < stringInfo.LengthInTextElements; i++)
            {
                string token = stringInfo.SubstringByTextElements(i, 1);
                charCode += "\n" + token + " : ";
                for (int j = 0; j < token.Length; j++)
                {
                    charCode += " " + ((int)token[j]).ToString("X4");
                }
            }

            this.textBlock1.Text =                  "StringInfo.LengthInTextElements = " + stringInfo.LengthInTextElements +
                "\nstring.Length = " + text.Length +
                "\n" + charCode;
        }
    }
}

2012年12月25日火曜日

10mメッシュ標高データで地図を作成

「5mメッシュ標高データで地図を作成」では、1メッシュごとにRectangle オブジェクトを生成していましたが、ここではビットマップ画像を作成します。
1メッシュが1ピクセルになります。
標高は512mまでを256段階のグレースケールで表現し、512m以上は一律黒にします。
10mメッシュ標高データのXMLをみると、1125列×750行のメッシュになっているので、1125×750ピクセルの画像が生成されることになります。

サンプルは、沖縄県の辺野古あたりです。
XMLファイルは、「FG-GML-3928-60-dem10b-20090201.xml」です。


MainWindow.xaml

<Window x:Class="GisTest2.MainWindow"
        xmlns="http://schemas.microsoft.com/winfx/2006/xaml/presentation"
        xmlns:x="http://schemas.microsoft.com/winfx/2006/xaml"
        Height="250" Width="325">
    <Window.CommandBindings>
        <CommandBinding Command="Open" Executed="OpenCommandHandler"/>
    </Window.CommandBindings>
    <Grid>
        <Grid.RowDefinitions>
            <RowDefinition Height="Auto"/>
            <RowDefinition Height="*"/>
        </Grid.RowDefinitions>
        <Menu Grid.Row="0">
            <MenuItem Command="Open" />
        </Menu>
        <ScrollViewer Grid.Row="1" HorizontalScrollBarVisibility="Visible" VerticalScrollBarVisibility="Visible">
            <Canvas Name="canvas1" Margin="2"/>
        </ScrollViewer>
    </Grid>
</Window>

MainWindow.xaml.cs

using Microsoft.Win32;
using System;
using System.Text.RegularExpressions;
using System.Windows;
using System.Windows.Input;
using System.Windows.Media;
using System.Windows.Media.Imaging;
using System.Windows.Shapes;
using System.Xml;

namespace GisTest2
{
    public partial class MainWindow Window
    {
        private static Color[] myColors = new Color[256];

        static MainWindow()
        {
            byte i = 0;
            while (true)
            {
                myColors[i] = Color.FromRgb(i, i, i);
                if (i == 255)
                {
                    break;
                }
                i++;
            }
        }

        public MainWindow()
        {
            InitializeComponent();
        }

        private void OpenCommandHandler(object sender, ExecutedRoutedEventArgs e)
        {
            OpenFileDialog ofd = new OpenFileDialog();
            if (ofd.ShowDialog() == true)
            {
                XmlDocument xdoc = new XmlDocument();
                xdoc.Load(ofd.FileName);

                XmlNamespaceManager xnm = new XmlNamespaceManager(xdoc.NameTable);
                xnm.AddNamespace("gml""http://www.opengis.net/gml/3.2");

                XmlElement dataXe = (XmlElement)xdoc.SelectSingleNode("//gml:tupleList", xnm);
                XmlElement lowXe = (XmlElement)xdoc.SelectSingleNode("//gml:low", xnm);
                XmlElement highXe = (XmlElement)xdoc.SelectSingleNode("//gml:high", xnm);

                string[] lowPoint = lowXe.InnerText.Split(' ');
                string[] highPoint = highXe.InnerText.Split(' ');
                int xSize = int.Parse(highPoint[0]) - int.Parse(lowPoint[0]) + 1;
                int ySize = int.Parse(highPoint[1]) - int.Parse(lowPoint[1]) + 1;
                string data = dataXe.InnerText;

                this.canvas1.Width = xSize;
                this.canvas1.Height = ySize;

                DrawMap(xSize, ySize, data);
            }
        }

        private void DrawMap(int xSize, int ySize, string data)
        {
            float[,] heights = new float[xSize, ySize];

            Regex regex = new Regex("[^,\\r\\n]+,[^,\\r\\n]+");
            MatchCollection mc = regex.Matches(data);
            int index = 0;
            foreach (Match in mc)
            {
                string[] unit = m.Value.Split(',');
                heights[index % xSize, index / xSize] = float.Parse(unit[1]);
                index++;
            }

            this.canvas1.Children.Clear();

            byte[] pixcels = new byte[xSize * ySize * 4];
            for (int y = 0; y < ySize; y++)
            {
                for (int x = 0; x < xSize; x++)
                {
                    double height = Math.Floor(heights[x, y] / 2.0);
                    Color fillColor;
                    if (height <= 0)
                    {
                        fillColor = Colors.LightSeaGreen;
                    }
                    else if (height > 255)
                    {
                        fillColor = Colors.Black;
                    }
                    else
                    {
                        fillColor = myColors[(byte)(255 - height)];
                    }
                    int pixcelIndex = xSize * 4 * y + x * 4;
                    pixcels[pixcelIndex] = fillColor.B;
                    pixcels[pixcelIndex + 1] = fillColor.G;
                    pixcels[pixcelIndex + 2] = fillColor.R;
                    pixcels[pixcelIndex + 3] = 0;
                }
            }
            Int32Rect rect = new Int32Rect(0, 0, xSize, ySize);

            WriteableBitmap bitmapImage = new WriteableBitmap(xSize, ySize, 96, 96, PixelFormats.Bgr32, null);
            bitmapImage.WritePixels(rect, pixcels, xSize * 4, 0);

            Rectangle rectangle = new Rectangle();
            rectangle.Width = xSize;
            rectangle.Height = ySize;
            rectangle.Fill = new ImageBrush(bitmapImage);
            this.canvas1.Children.Add(rectangle);
        }
    }
}

2012年12月22日土曜日

5mメッシュ標高データで地図を作成

メッシュ標高データを使って地図を作成します。
データは XML で、ある緯度経度のエリアを、縦横5mごとの格子に分割した標高データが格納されています。

南北と東西がいくつの格子からなっているかは、low要素と high要素から判別します。
サンプルでは、南北が 0から149まで、東西が0から224 までなので 225列×150行の合計33750個の格子が存在ます。
どの格子が標高何メートルなのかは、tupleList要素を見ます。 各格子の標高が改行区切りで格納さています。順番は、最初が1行目の1列目で、2、3列目とつづき、225列目までいったら、226個目が2行目の1列目です。

1つのXMLファイルで、東西が5m×225=1125mのエリアの地図が描けることになります。
各格子の標高が0mから50mなら色の濃淡をつけて、50m以上なら黒、マイナスなら水色にしています。

5mメッシュ標高データは、国土地理院の基盤地図情報のダウンロードページから入手できます。 (http://fgd.gsi.go.jp/download/)


ログイン後、基盤地図情報 数値標高モデル JPGIS (GML)形式
→ 5mメッシュ → 沖縄 → 3927 → 392715
を選択して、沖縄県糸満市周辺のデータをダウンロードします。
サンプルでは、ダウンロードした FG-GML-3927-15-DEM5B.zipを 解凍してできたファイル「FG-GML-3927-15-02-DEM5B-20110915.xml」を読み込んでいます。


Google Map でみた同じ場所


MainWindow.xaml

<Window x:Class="GisTest.MainWindow"
        xmlns="http://schemas.microsoft.com/winfx/2006/xaml/presentation"
        xmlns:x="http://schemas.microsoft.com/winfx/2006/xaml"
        Height="380" Width="480">
    <Window.CommandBindings>
        <CommandBinding Command="Open" Executed="OpenCommandHandler"/>
    </Window.CommandBindings>
    <Grid>
        <Grid.RowDefinitions>
            <RowDefinition Height="Auto"/>
            <RowDefinition Height="*"/>
        </Grid.RowDefinitions>
        <Menu Grid.Row="0">
            <MenuItem Command="Open" />
        </Menu>
        <Canvas Grid.Row="1" Name="canvas1" Margin="3">
            <Canvas.Resources>
                <Style TargetType="Rectangle">
                    <Setter Property="StrokeThickness" Value="0" />
                    <Setter Property="Width" Value="2" />
                    <Setter Property="Height" Value="2" />
                </Style>
            </Canvas.Resources>
        </Canvas>
    </Grid>
</Window>

MainWindow.xaml.cs

using Microsoft.Win32;
using System;
using System.Text.RegularExpressions;
using System.Windows;
using System.Windows.Controls;
using System.Windows.Input;
using System.Windows.Media;
using System.Windows.Shapes;
using System.Xml;

namespace GisTest
{
    public partial class MainWindow Window
    {
        public MainWindow()
        {
            InitializeComponent();
        }

        private void OpenCommandHandler(object sender, ExecutedRoutedEventArgs e)
        {
            OpenFileDialog ofd = new OpenFileDialog();
            if (ofd.ShowDialog() == true)
            {
                XmlDocument xdoc = new XmlDocument();
                xdoc.Load(ofd.FileName);

                XmlNamespaceManager xnm = new XmlNamespaceManager(xdoc.NameTable);
                xnm.AddNamespace("gml""http://www.opengis.net/gml/3.2");

                XmlElement dataXe = (XmlElement)xdoc.SelectSingleNode("//gml:tupleList", xnm);
                XmlElement lowXe = (XmlElement)xdoc.SelectSingleNode("//gml:low", xnm);
                XmlElement highXe = (XmlElement)xdoc.SelectSingleNode("//gml:high", xnm);

                string[] lowPoint = lowXe.InnerText.Split(' ');
                string[] highPoint = highXe.InnerText.Split(' ');
                int xSize = int.Parse(highPoint[0]) - int.Parse(lowPoint[0]) + 1;
                int ySize = int.Parse(highPoint[1]) - int.Parse(lowPoint[1]) + 1;
                string data = dataXe.InnerText;

                DrawMap(xSize, ySize, data);
            }
        }

        private void DrawMap(int xSize, int ySize, string data)
        {
            float[,] heights = new float[xSize, ySize];

            Regex regex = new Regex("[^,\\r\\n]+,[^,\\r\\n]+");
            MatchCollection mc = regex.Matches(data);
            int index = 0;
            foreach (Match in mc)
            {
                string[] unit = m.Value.Split(',');
                heights[index % xSize, index / xSize] = float.Parse(unit[1]);
                index++;
            }

            this.canvas1.Children.Clear();

            for (int x = 0; x < xSize; x++)
            {
                for (int y = 0; y < ySize; y++)
                {
                    Rectangle r = new Rectangle();
                    r.SetValue(Canvas.LeftProperty, (double)x * 2);
                    r.SetValue(Canvas.TopProperty, (double)y * 2);
                    double height = Math.Floor(heights[x, y] * 5);
                    Color fillColor;
                    if (height <= 0)
                    {
                        fillColor = Colors.AliceBlue;
                    }
                    else if (height > 255)
                    {
                        fillColor = Colors.Black;
                    }
                    else
                    {
                        byte colorValue = byte.Parse((255 - height).ToString());
                        fillColor = Color.FromRgb(colorValue, colorValue, colorValue);
                    }
                    r.Fill = new SolidColorBrush(fillColor);
                    this.canvas1.Children.Add(r);
                }
            }
        }
    }
}

2012年12月13日木曜日

WPF Toolkit のChart で折れ線グラフ


WPF Toolkit の Chart クラスを使うと、簡単にグラフを描画できます。
折れ線グラフは、LineSeries クラスです。
左のDataGridの各行とグラフの各座標をバインドしています。
DataGrid の値を編集すると、アニメーションしながらグラフが更新されます。


座標(x,y)=(3,4)を追加したところ。


MainWindow.xaml

<Window x:Class="Chart2.MainWindow"
        xmlns="http://schemas.microsoft.com/winfx/2006/xaml/presentation"
        xmlns:x="http://schemas.microsoft.com/winfx/2006/xaml"
        xmlns:chartingToolkit="clr-namespace:System.Windows.Controls.DataVisualization.Charting;assembly=System.Windows.Controls.DataVisualization.Toolkit"
        Height="300" Width="500">
    <Grid>
        <Grid.ColumnDefinitions>
            <ColumnDefinition Width="130"/>
            <ColumnDefinition Width="Auto"/>
            <ColumnDefinition Width="*"/>
        </Grid.ColumnDefinitions>
        <DataGrid Grid.Column="0" Name="dataGrid1" AutoGenerateColumns="False">
            <DataGrid.Columns>
                <DataGridTextColumn Header="X" Width="60" Binding="{Binding X}"/>
                <DataGridTextColumn Header="Y" Width="60" Binding="{Binding Y}"/>
            </DataGrid.Columns>
        </DataGrid>
        <GridSplitter Grid.Column="1" VerticalAlignment="Stretch" HorizontalAlignment="Center" Width="4" />
        <chartingToolkit:Chart Grid.Column="2" >
            <chartingToolkit:Chart.Series>
                <chartingToolkit:LineSeries Name="lineSeries1" IndependentValuePath="X" DependentValuePath="Y"/>
            </chartingToolkit:Chart.Series>
        </chartingToolkit:Chart>
    </Grid>
</Window>

MainWindow.xaml

using System.Collections.ObjectModel;
using System.Windows;

namespace Chart2
{
    public partial class MainWindow Window
    {
        public MainWindow()
        {
            InitializeComponent();

            ObservableCollection<MyPoint> points = new ObservableCollection<MyPoint>();
            points.Add(new MyPoint(0, 0));
            points.Add(new MyPoint(1, 2));
            points.Add(new MyPoint(2, 1));
            this.dataGrid1.ItemsSource = points;
            this.lineSeries1.ItemsSource = points;
        }
    }
}

MyPoint.cs

namespace Chart2
{
    public class MyPoint
    {
        public double X { setget; }
        public double Y { setget; }

        public MyPoint()
        {
            this.X = 0;
            this.Y = 0;
        }

        public MyPoint(double x, double y)
        {
            this.X = x;
            this.Y = y;
        }
    }
}

int がオーバーフローするとどうなるか


C#は、デフォルトでは、算術計算などでオーバーフローしても例外を返しません。
int型の2つの値を掛け算して、結果もint型で表示してみます。
int型の最大値は、2の31乗-1 =2,147,483,647 なので、オーバーフローさせるには、結果がこれを超えるように入力します。
オーバーフローした場合は、上位ビットが切り捨てられます。

オーバーフローしない場合は、正しい計算結果になっている。


オーバーフローする場合は、結果がおかしい。


10進数で 100,000×100,000 は、10,000,000,000になる。
10進数の10,000,000,000を2進数で表すと34桁になる。
(2進)1001010100000010111110010000000000 = (10進)10,000,000,000
int(int32)は、1ビット目から31ビット目が値なので、それを10進数にすると、1,410,065,408 になる。
(2進)1010100000010111110010000000000 = (10進)1,410,065,408
符号を表す32ビット目が 0 なので 正の整数。

MainWindow.xaml


<Window x:Class="OverFlowTest.MainWindow"
        xmlns="http://schemas.microsoft.com/winfx/2006/xaml/presentation"
        xmlns:x="http://schemas.microsoft.com/winfx/2006/xaml"
        Height="85" Width="225">
    <Grid>
        <Grid.RowDefinitions>
            <RowDefinition Height="*"/>
            <RowDefinition Height="Auto"/>
        </Grid.RowDefinitions>
        <DockPanel Grid.Row="0">
            <TextBox Name="textBoxX1" Width="50"/>
            <TextBlock>×</TextBlock>
            <TextBox Name="textBoxX2" Width="50"/>
            <TextBlock></TextBlock>
            <TextBlock Name="textBlockY"/>
        </DockPanel>
        <Button Grid.Row="1" Click="Button_Click_1">計算</Button>
    </Grid>
</Window>


MainWindow.xaml.cs

using System.Windows;

namespace OverFlowTest
{
    public partial class MainWindow Window
    {
        public MainWindow()
        {
            InitializeComponent();
        }

        private void Button_Click_1(object sender, RoutedEventArgs e)
        {
            int x1 = int.Parse(this.textBoxX1.Text);
            int x2 = int.Parse(this.textBoxX2.Text);
            int y = x1 * x2;
            this.textBlockY.Text = y.ToString();
        }
    }
}

try、catch、finally と ハンドルされていない例外

例外処理をするには、try-catch-finally 構文を使いますが、各ブロックの中で、return や 例外が発生したときに、どのような処理フローになるのかを再確認します。

4つのパターンを試しています。
1.tryの中でreturn
2.tryの中で例外発生
3.tryの中で例外発生かつcatchの中でreturn
4.tryの中で例外発生かつcatchの中で例外発生

各パターンをボタンの Click イベントハンドラに記述します。
try-catch-finally の各ブロックを通ったかどうかを TextBox に表示して確認します。


<Window x:Class="TryCatchTest.MainWindow"
        xmlns="http://schemas.microsoft.com/winfx/2006/xaml/presentation"
        xmlns:x="http://schemas.microsoft.com/winfx/2006/xaml"
        Height="250" Width="300">
    <Grid>
        <Grid.RowDefinitions>
            <RowDefinition Height="Auto"/>
            <RowDefinition Height="*"/>
        </Grid.RowDefinitions>
        <StackPanel Grid.Row="0">
            <Button Click="Button_Click_1">1.tryの中でreturn</Button>
            <Button Click="Button_Click_2">2.tryの中で例外発生</Button>
            <Button Click="Button_Click_3">3.tryの中で例外発生かつcatchの中でreturn</Button>
            <Button Click="Button_Click_4">4.tryの中で例外発生かつcatchの中で例外発生</Button>
        </StackPanel>
        <TextBox Grid.Row="1" Name="textBox1" />
    </Grid>
</Window>

1.tryの中でreturn

tryブロックの中で return しても、finally は必ず処理されます。

        private void Button_Click_1(object sender, RoutedEventArgs e)
        {
            this.textBox1.Clear();
            this.textBox1.Text += "## Start \n";
            try
            {
                this.textBox1.Text += "try1 \n";
                return;
            }
            catch
            {
                this.textBox1.Text += "catch1 \n";
            }
            finally
            {
                this.textBox1.Text += "finally1 \n";
            }
            this.textBox1.Text += "## Last \n";
        }

2.tryの中で例外発生

catch 、finally の順に 処理されます。

        private void Button_Click_2(object sender, RoutedEventArgs e)
        {
            this.textBox1.Clear();
            this.textBox1.Text += "## Start \n";
            try
            {
                this.textBox1.Text += "try1 \n";
                throw new Exception();
            }
            catch
            {
                this.textBox1.Text += "catch1 \n";
            }
            finally
            {
                this.textBox1.Text += "finally1 \n";
            }
            this.textBox1.Text += "## Last \n";
        }


3.tryの中で例外発生かつcatchの中でreturn

catchの中でreturn しても、finally は必ず処理されます。
finallyブロックを出たあとにコードを書いても、「到達できないコード」と警告が出るので、削除してます。


        private void Button_Click_3(object sender, RoutedEventArgs e)
        {
            this.textBox1.Clear();
            this.textBox1.Text += "## Start \n";
            try
            {
                this.textBox1.Text += "try1 \n";
                throw new Exception();
            }
            catch
            {
                this.textBox1.Text += "catch1 \n";
                return;
            }
            finally
            {
                this.textBox1.Text += "finally1 \n";
            }
        }

4.tryの中で例外発生かつcatchの中で例外発生

catch の中で発生させた例外は、ハンドルされていない例外なので、アプリケーションが動作を停止します。(アプリケーションエラー)


        private void Button_Click_4(object sender, RoutedEventArgs e)
        {
            this.textBox1.Clear();
            this.textBox1.Text += "## Start \n";
            try
            {
                this.textBox1.Text += "try1 \n";
                throw new Exception("tryの中で例外発生!");
            }
            catch
            {
                this.textBox1.Text += "catch1 \n";
                throw new Exception("catchの中で例外発生!");
            }
            finally
            {
                this.textBox1.Text += "finally1 \n";
            }
        }

Application クラスの DispatcherUnhandledException イベントを使うと、ハンドルされていない例外を一括して処理することができます。
ハンドルされていない例外が発生すると、Application クラスの DispatcherUnhandledException イベントが発生します。
ここでは、イベントハンドラで、メッセージボックスを出して、アプリケーションを継続するようにしています。

<Application x:Class="TryCatchTest.App"
             xmlns="http://schemas.microsoft.com/winfx/2006/xaml/presentation"
             xmlns:x="http://schemas.microsoft.com/winfx/2006/xaml"
             StartupUri="MainWindow.xaml" 
             DispatcherUnhandledException="Application_DispatcherUnhandledException_1">
</Application>

using System.Windows;
using System.Windows.Threading;

namespace TryCatchTest
{
    public partial class App Application
    {
        private void Application_DispatcherUnhandledException_1(object sender, DispatcherUnhandledExceptionEventArgs e)
        {
            MessageBox.Show(e.Exception.Message);
            e.Handled = true;
        }
    }
}

2012年12月10日月曜日

Visual をXPSファイルに保存する

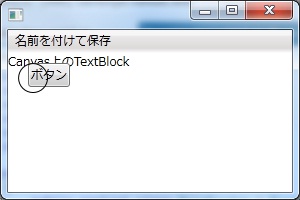
Canvas に TextBlock、Button、Ellipse を追加して、CanvasをXPSファイルに保存します。
  1. ファイル名を指定して、XpsDocumentオブジェクトを作成。
  2. XpsDocument.CreateXpsDocumentWriter を使って、1.で作成した XpsDocumentオブジェクトから、XpsDocumentWriter オブジェクトを作成。
  3. 2.で作成した XpsDocumentWriterオブジェクトの CreateVisualsCollatorメソッドで、VisualsToXpsDocumentオブジェクトを作成。
  4. 3.で作成した VisualsToXpsDocumentオブジェクトの Writeメソッドで、書き込みたいVisual オブジェクト を指定して書き込み。 

using (XpsDocument xpsdoc = new XpsDocument(sfd.FileName, FileAccess.Write)) //1
{
   XpsDocumentWriter xpsdw = XpsDocument.CreateXpsDocumentWriter(xpsdoc); //2
   VisualsToXpsDocument vToXpsD = (VisualsToXpsDocument)xpsdw.CreateVisualsCollator(); //3
   vToXpsD.Write(this.canvas1); //4
   vToXpsD.EndBatchWrite();
}


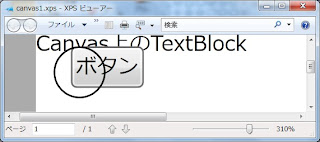
保存したファイルをXPSビューアーで開いてみます。画面のハードコピーではないので、拡大しても滑らかです。


MainWindow.xaml

<Window x:Class="SaveXps.MainWindow"
        xmlns="http://schemas.microsoft.com/winfx/2006/xaml/presentation"
        xmlns:x="http://schemas.microsoft.com/winfx/2006/xaml"
        Height="200" Width="300">
    <Window.CommandBindings>
        <CommandBinding Command="SaveAs" Executed="SaveAsCommandHandler" />
    </Window.CommandBindings>
    <Grid>
        <Grid.RowDefinitions>
            <RowDefinition Height="Auto"/>
            <RowDefinition Height="*"/>
        </Grid.RowDefinitions>
        <Menu Grid.Row="0">
            <MenuItem Command="SaveAs"/>
        </Menu>
        <Canvas Grid.Row="1" Name="canvas1">
            <TextBlock>Canvas上のTextBlock</TextBlock>
            <Button Canvas.Top="10" Canvas.Left="20">ボタン</Button>
            <Ellipse Canvas.Top="10" Canvas.Left="10" Stroke="Black" Width="30" Height="30" />
        </Canvas>
    </Grid>
</Window>

MainWindow.xaml.cs

using Microsoft.Win32;
using System.IO;
using System.Windows;
using System.Windows.Input;
using System.Windows.Xps;
using System.Windows.Xps.Packaging;

namespace SaveXps
{
    public partial class MainWindow : Window
    {
        public MainWindow()
        {
            InitializeComponent();
        }

        private void SaveAsCommandHandler(object sender, ExecutedRoutedEventArgs e)
        {
            SaveFileDialog sfd = new SaveFileDialog();
            if (sfd.ShowDialog() == true)
            {
                using (XpsDocument xpsdoc = new XpsDocument(sfd.FileName, FileAccess.Write))
                {
                    XpsDocumentWriter xpsdw = XpsDocument.CreateXpsDocumentWriter(xpsdoc);
                    VisualsToXpsDocument vToXpsD = (VisualsToXpsDocument)xpsdw.CreateVisualsCollator();
                    vToXpsD.Write(this.canvas1);
                    vToXpsD.EndBatchWrite();
                }
            }
        }
    }
}